Estimated Read Time: 39 Minutes
Table of Contents
- Introduction
- Step 1: Open A New Post Template
- Step 2: Enter Draft Post Body Text
- Step 3: Choose Keywords
- Step 4: Specify an SEO Title
- Step 5: Specify Your Post Title
- Step 6: Specify Your Post Permalink
- Step 7: Incorporate Keywords Into Post Body Text
- Step 8: Create a Post Meta Description
- Step 9: Add and Optimize Images
- Step 10: Categorize and Tag Post
- Step 11: Specify The Post Author
- Step 12: Final Checkpoints and a Caveat
- A Checklist
This post was last updated on 09/07/2020. Snapshots of the Yoast plugin are from 2017 and will differ slightly from what you see today.
Introduction
This article is a detailed guide for how to optimize a blog post using WordPress and Yoast, the popular WordPress SEO plugin by Joost de Valk and his team. It assumes you have already determined what you want to write about, you have a shot at ranking in the top 10, your post is aimed at a specific audience, and you know how to make your post uniquely valuable. Lastly, it assumes post content has already been drafted and you are now ready to begin the optimization process by performing on-page optimization.
If you’re feeling lost already, I highly recommend SEO For Bloggers: How to Nail the Optimization Process For Your Posts by Rand Fishkin at Moz. It’s a 13-minute video presentation about the end-to-end blogging process as it pertains to SEO. I think a lot of people are surprised to learn that many published posts do not immediately rank well in search results. Rankings are hard to achieve, largely driven by increased competition, more sophisticated and demanding audiences, and of course, Google’s ranking algorithms which tend to favor established brands and top-quality content.
This article is specifically aimed at WordPress bloggers that aren’t familiar with on-page optimization and want to learn how. It’s laid out in 12 steps.
It’s a long post. Grab a cup of your favorite beverage and get comfortable. There’s a best-practice PDF checklist at the end you can use to speed up the process without having to keep referring back here. Backlinko, a training hub for digital marketers, has an infographic that is also a good tool and visual reminder of what needs to be done. You might want to keep the infographic and the checklist handy until this becomes a natural, fluid process.
Step 1: Open A New Post Template
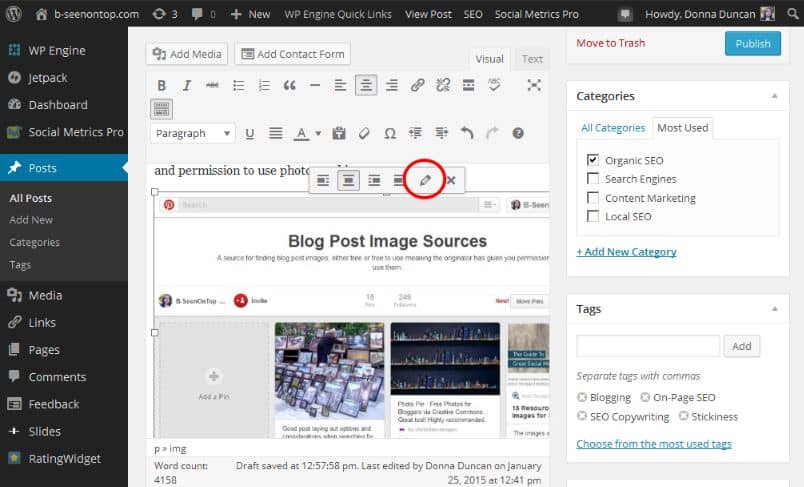
Scan the left-hand WordPress Main Menu options. Find and click on Posts >> Add New post as shown below.
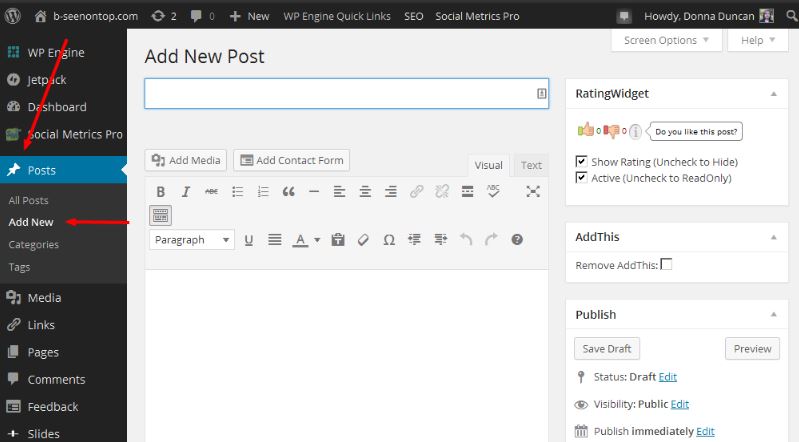
An empty blog posting screen (like the one shown above) opens up. Yours won’t look exactly the same as this because the name of your blog, where it is hosted, and the theme (template) and plugins (added features/functions) used to create your site will be different. That said, yours should still have a place to enter your post title (“Enter title here”) and body text (where you see the big red X below).
Enter your draft blog post title. We’ll revisit it in Step 3.
Step 2: Enter Draft Post Body Text
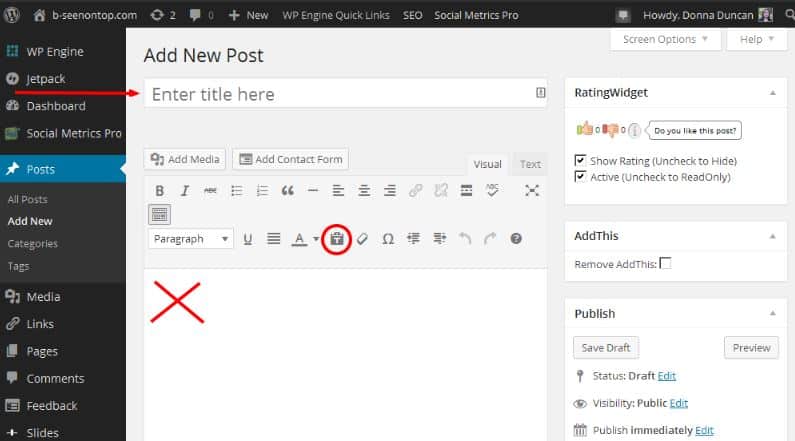
Type (or cut and paste) your draft blog post content into the white space marked with a big red “X” shown above.
Depending on your theme, the text might not copy cleanly. You might see some extra spaces or weird-looking characters. Some themes allow you to cut and paste text directly from a word processing package with zero problems. Others have a special icon (like the black clipboard icon circled above in red) you can use to minimize cut and paste errors. If your content doesn’t paste cleanly, try clicking on that icon first. Otherwise, you’ll have to cut and paste it into a basic text editor like Microsoft Notepad first or clean it up manually after it’s pasted.
To clean it up manually, click on the “text” tab to the right and above the circled “T” shown above. This will show you the code that sits behind your post content. You will more easily be able to see when special characters have been added in using the text mode or if code settings are incorrect.
We’re not done with your post content yet. We’ll come back to it again in Step 7. For now, move on to the next step.
Step 3: Choose Keywords
Choosing keywords for your post is the most important part of optimizing a blog post. It’s important to get it right.
Keywords are the words or phrases people type into a search engine when they’re trying to find something. They’re also the words or phrases you want your content to be found for.
In this step, we’re going to figure out what people are typing into Google when they are searching for content similar to the content you’re creating. Once we know the terms your audience is searching for, we can incorporate them into your post so it becomes eligible to rank.
It’s a ten-step process. We are going to:
- enter your post title;
- gather keyword options;
- assess the relevance, specificity and search volume of options;
- bring it all together with an example;
- explain the need for uniqueness;
- define an exact match and close variation;
- tell you how to pick secondary keyword phrases; and
- show you where to plug your choices into the WordPress for SEO Yoast plugin.
If you’re already familiar with WordPress, you can probably skim thru a lot of these sections. It’s pretty detailed. I didn’t want to assume anything.
3.1: Enter Your Focus Keyword Phrase
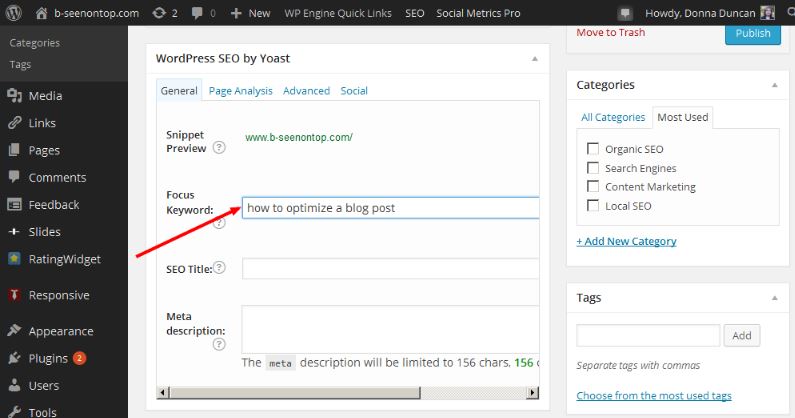
Once you know the focus of your post, scroll down to the grey outlined box marked “Wordpress SEO by Yoast”. It looks something like this.
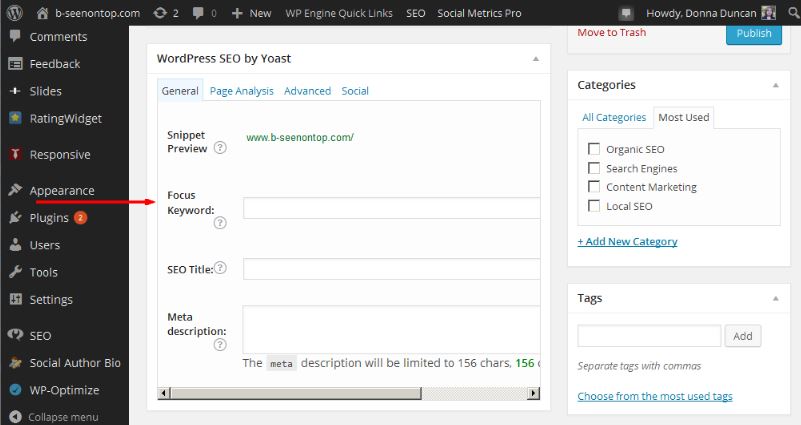
Look for the field labeled “focus keyword”, shown roughly in the middle of the image above with a red arrow. The “focus keyword” is the word or phrase you want your post or page to be found for when people are searching the Web.
We’re going to figure that out next.
3.2 Gather Keyword Options
There are many different ways to do keyword research, most of them involving expensive SEO tools. Not everyone has a budget for or access to these tools so, for our purposes, we are going to use Google Suggest, a tool that lets you know what’s trending in search right now.
To access the Google suggest tool, we’re going to have to step outside of WordPress and Yoast. I usually just open a new window in my browser.
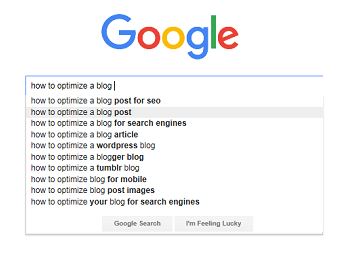
You’ve probably experienced Google Suggest but may not have known it. Google Suggest is Google’s auto-complete function. If you start typing a word or phrase into a Google search window or browser address bar (when Google is your default search engine), suggestions will start to pop up below the window. Suggestions are displayed in search volume order, meaning the ones closest to the top are searched for the most often. If no suggestions appear it means Google didn’t find anything or it has chosen not to share options with you. Roughly 16% of the queries Google sees on a daily basis are brand new and Google doesn’t always share everything that’s in its Suggest database. You won’t see those.
You can access the Google Suggest tool by opening a new browser window and going to google.com. Type a 3-to-5-word phrase that best summarizes the topic of your blog post and see what pops up. In this example, I’ve typed “How to optimize a blog”.
If no suggestions display, try a different phrase or use a unique subset of what you’ve chosen as your draft post title and skip down to step 3.10.
If you have multiple suggestions and need help deciding which to use, keep reading.
3.3 Assess Relevance
The most important consideration when picking a focus keyword phrase is relevance. It’s not the number of words in the phrase or whether it appears at the top, middle, or bottom of the list of suggestions. It’s relevance.
Relevance ensures visitors find what they came searching for. It increases the chance visitors will read your post and spend more time on your site. All things being equal, the more time visitors spend on your post, the more likely Google will consider it relevant, and the higher it will rank. Alternatively, if Google thinks you’re using terms just to bait people to your website and you don’t deliver, you’ll see that reflected in your rankings as well.

photo credit: Dick Thomas Johnson via photopin cc
If, for example, your post is about lineups at Starbucks Coffee Shops, don’t pick the single word “lineups”, “Starbucks” or “coffee” as your focus keyword phrase. All will likely appear closer to the top of your list of suggestions but none are as specific or relevant as the combination of the three. When suggestions pop up, pick the one that best reflects/mirrors your post intent even if it doesn’t appear in Google’s list of suggestions after several tries. Relevance should always be your first and foremost consideration. As I just mentioned, 16% of search phrases are brand new, every day so if your first choice doesn’t appear in the list of suggestions, don’t let that deter you.
3.4: Assess Specificity
What if two phrases are similar and both “fit” your content?
The longer the phrase the better. When a searcher uses a wordier phrase, he or she has thought more deeply about what it is they are looking to find. They’ve probably already visited a few pages and are narrowing their choices. Those people are usually closer to making a buying decision. They’re more likely to stay on your page and site longer and “convert” – do what you want them to do.
If two phrases are equally relevant, go with the one that is longer – the one with the most words.
3.5: Assess Search Volume
The final consideration is search volume.
Keyword suggestions are always displayed in descending order of search volume. The phrases closest to the top are the ones typed most frequently into Google’s search engine. All things being equal (if you’re trying to decide between two focus keyword phrases that are very close or similar and have the same number of words in them), pick the one closest to the top because it will probably have the same or a higher number of searches per month than the one(s) below.
To show you what I mean, I took some suggestions from the example above (how to optimize a blog) and plugged them into a different keyword tool, Google’s (free to use) keyword tool, Google Planner. Google Keyword Planner gives you very rough search volumes. Sample results are shown below.
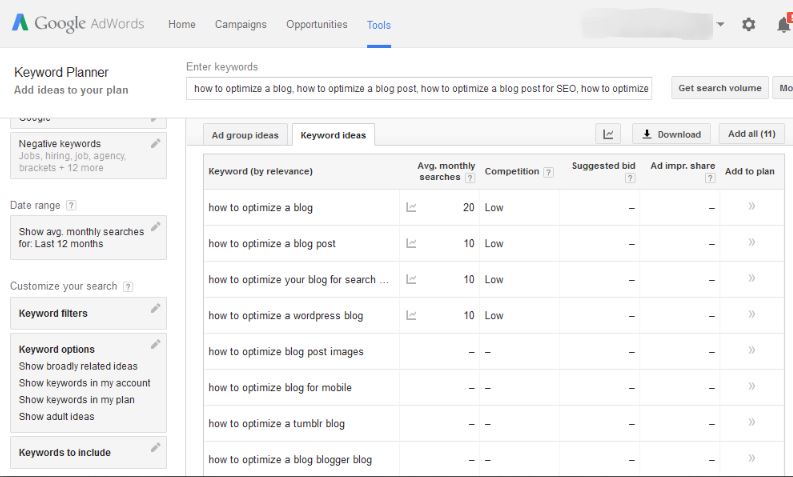
It’s fuzzy, but you can make out the average number of searches per month in the second column roughly in the middle of the page. As you can see, the options supplied are displayed in descending order of search volume. If you’re trying to decide between two equally relevant keyword phrases, pick the one with the largest search volume, the one closest to the top of Google’s suggestions.
The paid keyword tools I mentioned earlier provide more precise search volumes.
3.6: Bring It All Together
Using this post as an example, I chose to go with the phrase second from the top. “How to optimize a blog post”. It is relevant, specific, and, of the options provided, most reflective of what I want to say.
Now it gets really interesting.
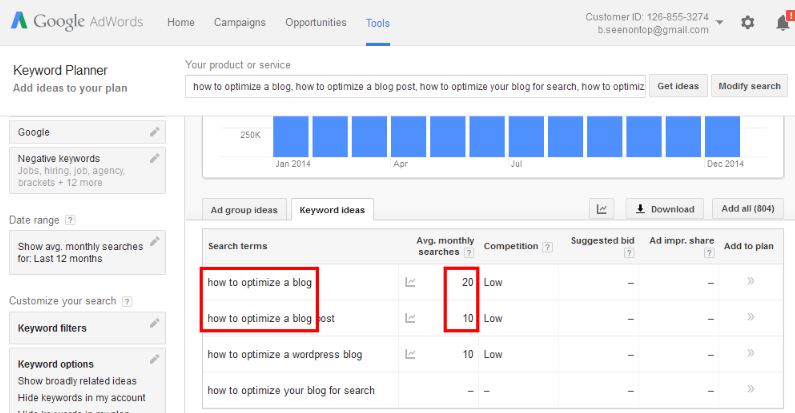
If we look back at the results found when I plugged our keyword options into the Google Planner tool, I want you to notice something. See how the words in the first option are entirely embedded within the second? “How to optimize a blog” is entirely embedded in “how to optimize a blog post“. That means because I chose to go with the second phrase, I’ll also be eligible to rank for the first. It also means that the total average number of monthly searches I’ll be eligible to rank for has likely gone up. That said, go with the longer of two choices. You won’t necessarily rank for both of them as the shorter one will have more competition and it’ll be harder to rank highly for. But who knows? Over time, your post might eventually perform well enough – earn enough engagement and links – to outrank the competition.
3.7: Assess Uniqueness
Before we move away from picking your target keyword phrase, there’s one more important consideration. Your focus keyword phrase should always be unique to your site, meaning you should not have more than one page or post optimized for a single focus keyword phrase.
That means if you already have a page or post on your website that is optimized for your chosen keyword phrase, you should pick something else. Why? Because if you don’t, you’ll confuse Google about which page to rank higher and end up competing with yourself. There’s plenty enough competition without competing against yourself!
The easiest way to figure out if you’ve already optimized for your preferred keyword phrase is to save a quick DRAFT copy of your post (if you haven’t done that already) and scroll down to the WordPress SEO by Yoast plugin window near the bottom of the page.
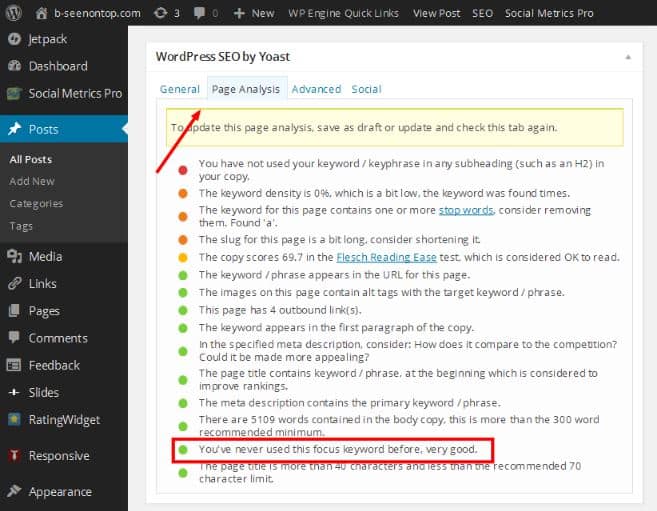
Click on the SEO tab at the top and the SEO Analyis drop-down button. Then scroll down to the bullet point second from the bottom. The bullet point or dot will be green, yellow, or red. If your focus keyword phrase is unique to the site it will be green. If it’s not or your proposed focus keyword phrase is an exact match or close variation to one that is already being used to optimize another page or post on your site, you should change it.
Some people also like to keep a simple spreadsheet that allows them to keep track of the keywords they’ve used and which ones they still need content for. That can be very helpful too.
3.8 Consider Search Intent
Google’s ranking algorithm is very sophisticated. In fact, Google understands there can be many different ways to say the same thing. “Exact matches” and “close variations” are just one example.
- An exact match is when the words or a close variation of the words in your proposed target keyword phrase appear in the same sequence in the focus keyword phrase field of another page or post on your site with no extra spaces or missing or additional characters.
- Close variations extend that definition to include misspellings, singular and plural forms, acronyms, stemmings (such as “post” and “posting”, “run” and “running”, “wait” and “waited”), abbreviations, and accents. If your chosen target keyword phrase uses the same words in a different order or it includes an extra word or two in the middle of the phrase, it’s NOT an exact match and you’re good to go.
Examples of an exact match for the chosen focus keyword phrase above (how to optimize a blog post) include:
- learn how to optimize a blog post;
- ways to optimize blog posts; and
- how to optimize a blog article.
Examples of phrases that are NOT an exact match include:
- how to optimize a blog (less specific);
- how to optimize a WordPress blog (different topic);
- how to optimize your first blog post (more specific);
- how to optimize with WordPress and Yoast (different, broader topic); and
- how to search engine optimize a blog post (also more specific).
Google pays less attention to the exact phrasing of a search query and instead focuses on search intent – ensuring content delivers results that allow the searcher to accomplish what he or she set out to do. All of the examples in the exact match list above have the same search intent so you should only be optimizing one page or post to satisfy all those queries.
3.9: Choose Secondary Keyword Phrases
Before leaving your focus keyword options behind, scan the remaining Google Suggest options and note any you think might naturally fit within your post content. Only pick phrases that are highly relevant and similar to your chosen keyword phrase. Look for phrases you saw appear in the top 10 result’s content. Look also at what Google has suggested at the bottom of the search results page as “People also search for…”.
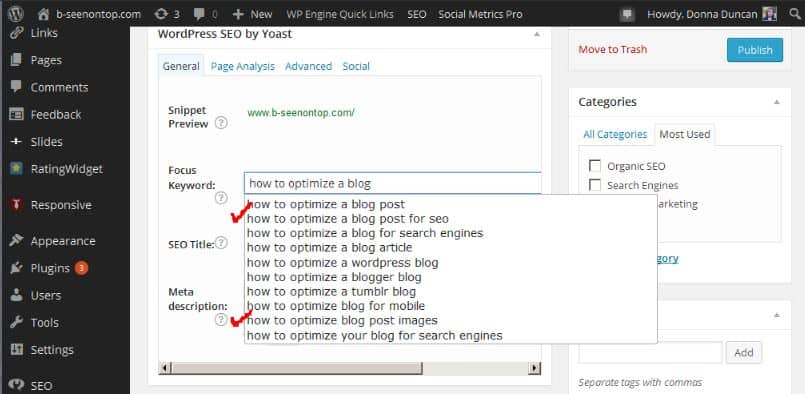
There is a lot of chatter in SEO circles about these types of keywords. You’ll see them referred to as latent semantic index or LSI keywords. LSI keywords do not help you rank higher in search results. My view is you should note these as a way of determining whether your content is comprehensive enough. In our example, if I don’t talk about “how to optimize post images” (shown checked below), then my post is probably less complete than others. I should talk about it or, at the very least, suggest another high-quality source where readers can find helpful information.
I noted a couple of additional (secondary) keyword phrases that are relevant to this post with red check marks below. They are “how to optimize a blog post for SEO” and “how to optimize blog post images”. I am going to include those phrases and topics in my content in Step 7.
Now we’re ready to plug our focus keyword phrase into the Yoast plugin.
3.10: Put Your Focus Keyword Phrase Into The Plugin
Enter your preferred focus keyword phrase into the focus keyword field of the Yoast plugin. I’ve entered my chosen focus keyword phrase in the example shown below.
We’re done with Step 3 – choosing keywords.
Step 4: Specify an SEO Title
Now that you have a focus keyword, it’s time to pick an SEO title. Your SEO title is the single most important thing you can manipulate to help boost your rankings. Your SEO title displays in search results and is your first opportunity to try and earn the attention of your audience.
Deciding on an SEO title is a 4-step process. Your SEO title needs to:
- accurately reflect your post content;
- use your focus keyword phrase;
- be compelling; and
- use between 50 and 60 characters not exceeding (currently) 600 pixels in length.
4.1: Reflect Your Post Content
Just like with your focus keyword phrase, your SEO title needs to accurately reflect your post content because it sets expectations with your readers and you don’t want to disappoint them.
Your SEO title is what gets displayed in search results. Here are examples of what shows up in search results when I search for “how to optimize a blog post”.

I’ve outlined in redthe content of the SEO title field for the first two search results. Both contain “how to optimize a blog post” or a close derivative. If I click on either one, that’s what I expect to learn more about.
Again, relevance is most important. Pick an SEO title that accurately reflects the intent and main message in your post. You also want to stand out when people are scanning search results. If you have extra space to work with, add more words to try to entice readers to click on your search result without disappointing them. You don’t need to go crazy. There is a meta description that appears right below the title tag. You’ll have room in there to set yourself apart even more.
4.2: Use Your Focus Keyword Phrase
Your SEO title needs to incorporate your focus keyword phrase.
Searchers scan results; they don’t read them. When they scan, they’re looking for search results containing their search terms. If your SEO title contains the same words as in a search query, Google will highlight them in search results helping your search result stand out from all the others. (Notice above how the words “blog”, “optimize” and “post” are bolded in the URLs displayed in search results.) Searchers also notice.
4.3: Be Compelling
To draw them in even further, your SEO title should be compelling. Seventy-one percent of searchers click on a page one search result. If your SEO title contains the terms someone is searching for, you’ll get their attention, but you’ll also want to draw them in further. You want to compel them to click.
I know I’m being repetitive, but it’s important. If you want help coming up with attention-grabbing and accurate post titles, check out my Headlines – Get People’s Attention Pinterest page. And again, don’t disappoint. I see a lot of SEO titles that promise one thing and the post delivers another. You’ll do yourself more harm than good if you fall into that habit because the people who click through to your search result are going to be disappointed. If they remember your domain name, you may not get a second chance.
HINT: Titles that invoke curiosity or emotion tend to earn more clicks.
4.4: Be Succinct
The final criteria you need to satisfy with your SEO title has to do with length. Your SEO title should be approximately 50-60 characters in length and not more than 600 pixels including spaces and special characters. If it’s less than that, it won’t be meaningful or compelling. If it’s more than that, it will get truncated in search results and possibly dilute the SEO value of your focus keyword phrase.
This isn’t a hard and fast rule. It’s a guideline, suggestion. Sometimes you won’t be able to fit within those parameters but do your best.
The search results we talked about earlier are shown again below. I want you to notice something about the second SEO title.
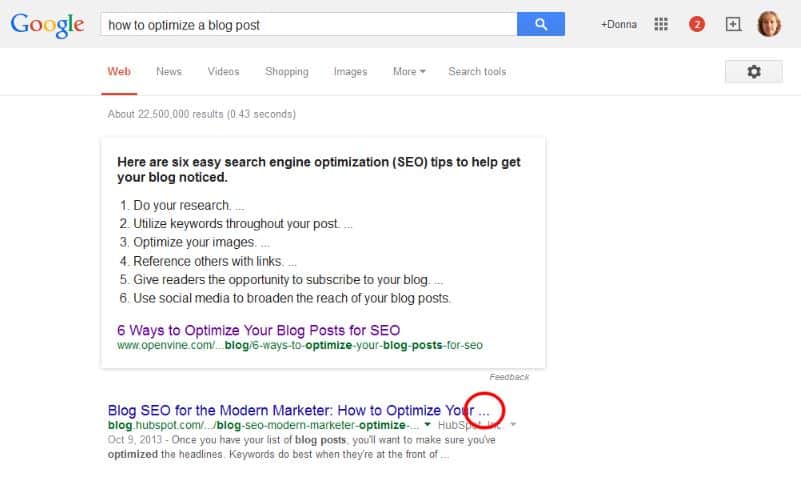
The SEO title for the second result is truncated. The ellipsis you see circled in red (above) is what Google inserts in search results when the 600 pixel limit for an SEO title tag is exceeded. The SEO title in this example exceeded 600 pixels and the words “blog posts” were cut off at the end.
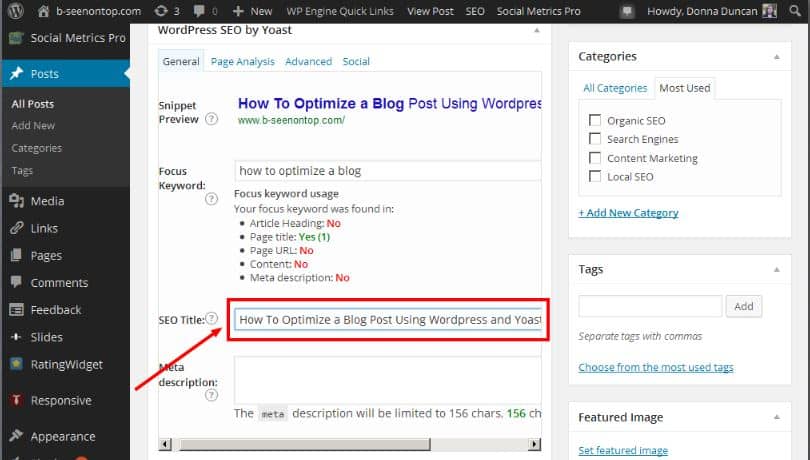
The focus keyword phrase for this post is the same as in our example – “how to optimize a blog post”. It contains 27 characters including spaces. Although it’s a great focus keyword, it’s too short and not specific or compelling enough to be our SEO title. I’m going to add the words “using WordPress and Yoast” to the end for a total of 53 characters and make that my post title. My hope is to attract people who actually want a detailed, step-by-step guide for WordPress and Yoast. They are the ones most likely to find value in this post and there’s less chance I’ll disappoint them than if they were using, for example, looking for a Wix or Shopify solution.
4.5: Put Your SEO Title Into The Yoast Plugin
Now you need to put your SEO title into the Yoast plugin. I’ve shown you an example by plugging my new SEO title into the SEO title field of the WordPress SEO by Yoast plugin below.
Step 5: Specify Your Post Title
The next step is to specify your post (vs SEO) title.
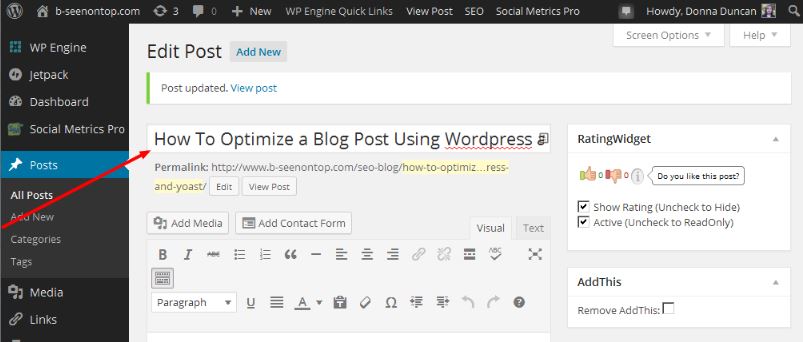
Your post title is not the same as your SEO title. Your SEO title gets displayed in search results. Your Post Title gets displayed as the main heading at the top of your blog post when someone visits your website. It is usually the first or second thing a visitor sees when he or she lands on the page. (Sometimes people notice the featured image first.) My post title is shown below, right below the site logo and adjacent to the post’s publication date (Jan 23).

Your post title and your SEO title can be the same or different. You don’t have to adhere as closely to the 60-character, 600-pixel limit when it comes to your post (vs SEO) title. Your title won’t get truncated if it goes over.
We entered a draft post title back in Step 2. Now we want to finalize it.
Your post title should also contain your focus keyword phrase so when visitors first land on the page, they’re reassured they are in the right place and the post is relevant. The best way to avoid disappointment or confusion is to make your post title the same or very similar to what you’ve used as your SEO title. The difference (again) is you’ve got more characters to play around with.
Once you decide, go back up to the top of your blog and enter your post title. In my example, I didn’t feel the need to elongate the blog post title. As you can see below, it’s exactly the same as my SEO title.
Step 6: Specify Your Post Permalink
The next step is to incorporate your focus keyword phrase into your post’s permalink or URL.
Just like your home or office has a unique postal address, your blog post has a unique address or permalink (permanent URLs or uniform resource locator). Permalinks display in search results below the SEO title. Your permalink can also influence your post’s ranking when it contains the keywords you want to rank for. (More on that in a minute.) Your post permalink needs to be unique and contain your focus keyword phrase.
You can see an example of what I have done for this post below. The permalink is shown in the red box (https://www.b-seenontop.com/seo-blog/how-to-optimize-blog-post-using-wordpress-yoast).
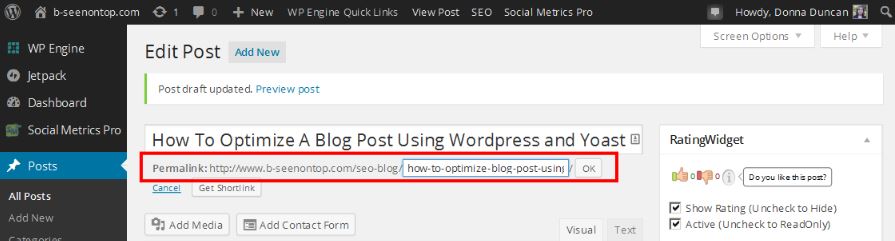
The easiest thing to do here is to cut and paste your SEO title into the permalink field. Make it all lower-case with hyphens (-) versus underscores (_). Get rid of any stop words, words like “a” and “the”. Google ignores them and they unnecessarily lengthen your post URL. If Yoast has been properly configured for SEO, stop words will be removed for you.
Don’t be excessively wordy in your URL. Shorter URLs are easier to remember, cut and paste, and reference when people are linking to you. Best practice is to keep it at or under 75 characters.
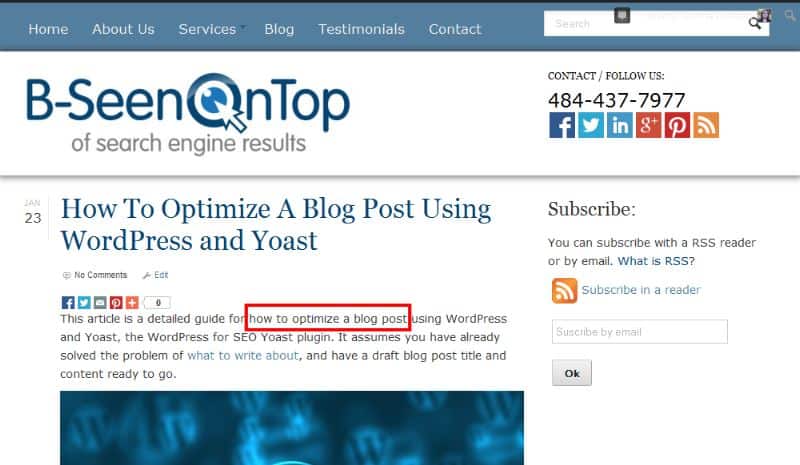
Step 7: Incorporate Keywords Into Post Body Text
Now it’s time to incorporate your focus (primary) and secondary keyword phrases in the post body text. For that, we need to go back to the “Add New Post” form we showed you back in Step 1. If you recall, we simply cut and pasted our post content and moved onto the next step. Now it’s time to edit it.
For short posts (posts with 600 words or less), try to incorporate your focus (or primary) keyword phrase 2-3 times in the post body text. For longer posts, aim to use it four to six times. Ideally, you’ll use your focus keyword phrase once in headings, once in the first paragraph of the post, once in the middle, and once again at the end. There is no exact number of times a keyword phrase should be used in a blog post. Do what makes sense for your readers. Don’t force it or it will sound unnatural and people will leave looking for something better. There’s nothing more annoying than a keyword-stuffed blog post that adds no value.
As you can see in the example below, I’ve managed to use my focus keyword phrase in the post title and the first sentence of the post body text. I’ve used it a total of 12 times in this post. 12 sounds like a lot, but it’s a long post that reads naturally so it is not a problem. These are guidelines, not rules. Do what best “fits” your content.
Your post title usually translates into an H1 (header) or tag in the code for the blog post. For years, it has been a best practice to ensure you use your target keyword phrase in the H1 tag and to use only H1 tag in the entire post. Recently there has been a lot of controversy over whether this is still necessary, whether it made any difference to rankings. Moz researched this and determined that it is, in fact, no longer necessary. The research showed that imply using “large text near the top of the page” is sufficient.
To add to the continuing confusion, Moz concluded there are other legitimate reasons to continue the “only 1 H1 at the top of the page” best practice. Those reasons include accessibility, usability, and ease of interpretation by Google. We agree. Use your focus keyword phrase once in your post title as an H1 heading and make that it is the only H1 heading on the page. If your theme prevents you from doing so, don’t sweat it. Just use large text near the top of the page and adjust the size of your other headings so it’s obvious they’re subordinate to your main heading.
Before we leave this “incorporate keywords into post body text” step, you should take the time to try to include secondary keyword phrases in your post content. Use them where they make sense. Try to use each of them at least once. If they don’t fit, don’t force it – don’t use them. The reason for doing this is not to help you rank for those secondary terms, but rather it’s a way of forcing you to assess whether your post is as comprehensive as it should be.
Step 8: Create a Post Meta Description
A meta description is a short synopsis of your post content. It has no role or influence when it comes to rankings. (Google says it ignores them.) Meta descriptions are, however, extremely important when it comes to convincing people to click through to your site. Meta descriptions are displayed in search results and your best opportunity to draw readers in. Keywords are bolded when they match the searcher’s search phrase and this helps make your SEO description stand out in search results.
The meta description for one of the search results for “how to optimize a blog post” is shown below as an example below.

An ideal meta description:
- uses your focus keyword phrase;
- is relevant and convincing;
- is 155-160 characters; and
- doesn’t employ quotes (“).
Steps 8.1 thru 8.4 will expand on each of these points individually.
8.1 Use Your Focus Keyword Phrase
You should try to use your focus keyword phrase in your meta description tag.
Just like with title tags and permalinks, if the words in your meta description match the words in the search query, Google will highlight them in bold so they stand out in search results. Notice how the words “blog posts” and “optimize” are bolded in the description shown above?
If you’re having trouble fitting your keyword phrase in without it sounding forced or unnatural, remember that your focus keyword phrase may be a bit shorter than your SEO or blog post title. In our example, the focus keyword phrase is “how to optimize a blog post” NOT “how to optimize a blog post using WordPress and Yoast“. If using your keyword phrase adds no value or encouragement, then skip it. Remember, the whole point of the meta description is to earn clicks.
You should also know that Google doesn’t always display the content of your meta description in search results. Sometimes, especially when your meta description tag does not match the search query or it’s excessively short, Google extracts what it wants from your post and displays that instead. You have no ability to control what Google chooses to display in search results but if you use your focus keyword and provide a decent length description, it increases the likelihood that you’ll remain in control.
8.2: Be Short and Convincing
Meta descriptions are your opportunity to let searchers know what to expect when they land on your site. You have a bit more room to maneuver here than you had with the SEO title field because you have roughly 155-160 characters to work with (including spaces and special characters). If your description is longer than that, you’ll run into the same problem as we did with SEO titles – they’ll be truncated.
Roughly 71% of searchers click on a page one search result. You want your meta description to stand out. Hubspot has a good post on ways you can try to be enticing with meta descriptions. Just again, don’t fall into the trap of being sensational. That’ll get you some clicks but it isn’t a sustainable, long-term strategy.
8.3 Don’t Use Quotes
One final warning. You should NOT use quotes in your meta description. They force truncation. Instead of seeing ‘Get detailed, step-by-step instructions for “how to optimize a blog post” using WordPress and Yoast’ displayed in search results, you’ll see “Get detailed, step-by-step instructions for”. The words after the first quote will be cut off.
Remember I said Google sometimes overwrites your meta description with something else. If you use quotes, there’s a greater likelihood they’ll do that.
8.4 Populate the Meta Description Field in Yoast
Once you’ve decided on the content of your meta description tag, populate it in the meta description field on the WordPress for SEO plugin as shown below.

Step 9: Add and Optimize Images
9.1: Select Images
Now we need to add some visual enticement. Images increase reader enjoyment and encourage repeat visits, more time on site, page views, comments, and sharing.
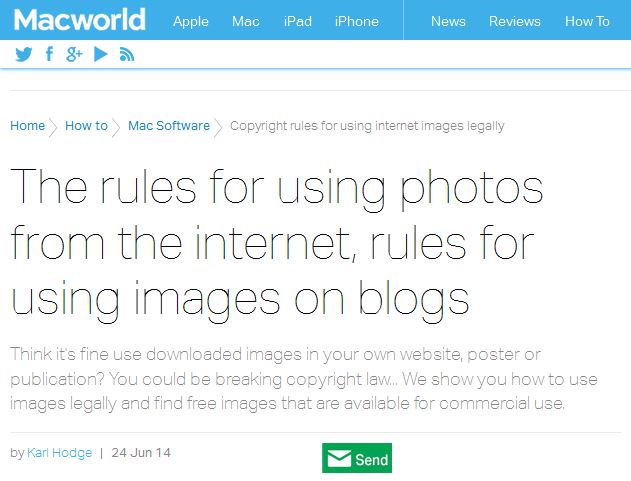
When deciding on which images to use, the most important consideration is ensuring you have permission. Free does NOT mean free to use.
Lots of people think that because creative content appears on the Internet it’s free to use. That’s usually not the case. PR Newswire wrote a brief article back in 2017 that explains the rules for using photos from the Internet and images on blogs. Make sure you read and understand the rules before using photos from the Internet in your content.
Bottom line, you need to find or purchase images you have permission to use or create your own. Visit my Pinterest board – “Blog Post Image Sources” – to identify sources of free and permission-to-use photos and images.
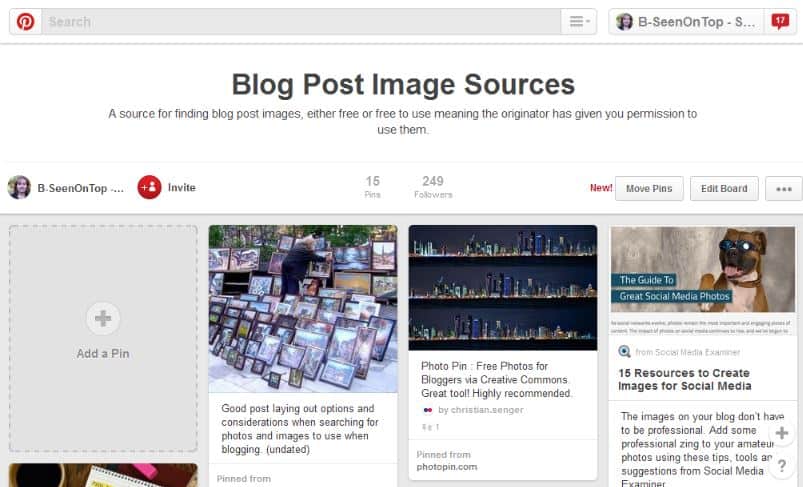
The other option is to purchase stock images. Just be aware if you’re on a limited budget it can grow to be expensive quickly. The best quality paid sources for photos (in my opinion) are Getty, Istock, Shutterstock, and Fotolia images. Lesser price (and quality) image options can be found on my Pinterest board as well as through a simple Google search.
9.2: Populate Alt Tags
Let’s use the image above as an example of how to optimize blog post images. I’m not going to explain how to upload images. Select an image already embedded into your post by clicking on it. You should see an edit box appear, like the one shown below. Click on the red-circled pen icon.
Enter a description of your image in the alt tag field as shown below.
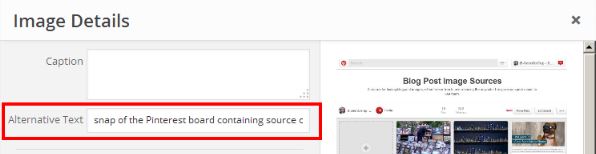
The description you enter needs to do two things. It needs to contain your focus keyword phrase and it needs to describe the image. Blind and visually-impaired readers have the option to use software to read aloud the content of alt tags. Don’t just selfishly plug in keywords. Make sure you provide an accurate description of the image at the same time.
Only put your focus keyword phrase in one or two image alt tags per post or it could be perceived by Google as “stuffing” or trying to “game the system”. Cramming extra keywords into your post or image alt tags with the vague hope that it will boost your rankings usually doesn’t work anyway. In the old days, when there was very little competition, it might have. Nowadays it’s more likely to harm you. Use your remaining image alt tags to ensure accessibility.
I also find it helpful to note image sources in image description fields just in case someone approaches you in the future with a concern that your images are not permissioned. You may not remember the source of the image. The people working on your site may have changed. It’s best to keep good records.
The content of your alt tag is used as the image description when posted on some social media sites like Pinterest. Many people just accept the description suggested so be aware of this. You might want to include your post name and/or website.
You can specify your alt tag content when you upload image files for the first time. You can also edit it after it has been uploaded as we did in the example above. Editing in-post alt tags lets you reuse an image multiple times with custom alt tags and focus keywords for each post. Every theme is different. Test this to be sure.
9.3: Link to Image
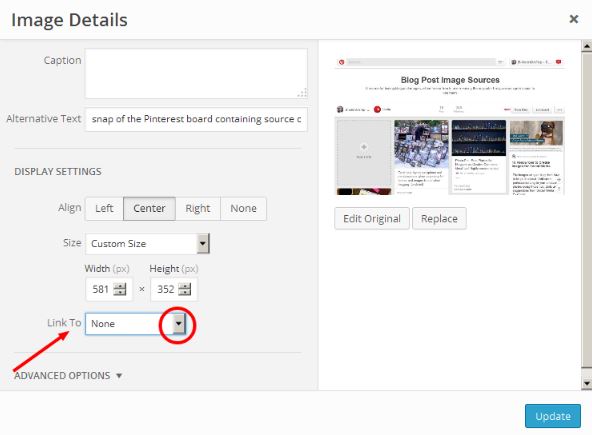
Below where you specify your alt tag, there’s an additional field labeled “link to”. This is where you specify what you want to happen if someone clicks on an image in your blog post. I select “none”. I want visitors to see the image in context if it shows up in search results and they click on it. In other words, I don’t want them to see just the image, I want them to see the image in the context of the page or blog post that references it.
9.4: Create A Caption (Optional)
The caption field is displayed below the image on the page. No need to optimize anything here. It’s the best place to:
- add text that helps your readers (like “Click to Enlarge” if you’ve linked to a media file or have a lightbox), and
- credit image authors if you’re using an image that requires attribution (like the ones I used in sections 3.3 and 8.1).
Step 10: Categorize and Tag Post
10.1: Pick Post Categories and Tags
We’re close to the end now!
I’m going to assume you’ve already established a groundwork of blog categories and tags for your site. If you haven’t, please take a quick look at my How To Pick Blog Categories and Tags post.
Categories and tags are for your visitors.
- Categories are like the table of contents in a book.
- Tags are like an index.
- They make it quick and easy for visitors to find what they’re looking for.
- They can extend visit time and give users more time to get to know, like, and trust you.
Unless… unless categories and tags are misused or applied thoughtlessly.
Too often people go overboard when they categorize and tag posts. That, or they don’t think it through and end up with too many and/or overlapping and confusing choices for site visitors (like shown below). When that happens, you slow down rather than speed up the process of visitors being able to find what they’re looking for and they’ll leave. There are tons of other options on the Internet, easier to use.

Can you differentiate between the tags: blog, blogging, blogging advice and blogging tips? I can’t.
Make sure your categories and tags are clearly differentiated. Don’t frustrate your audience by making them have to navigate to multiple pages of your site to find what they’re looking for. Most won’t.
10.2: Enter Post Blog Categories and Tags
Now you need to categorize and tag your post.
Look to the right of where you’re editing your post. You should see two boxes – one labeled “Categories”, the other “Tags”.
Check off the most appropriate category for your post. Click on “choose from the most used tags” and select the ones that pertain to your post. It’s okay to select more than one tag so long as each one is unique and not overlapping.
10.3: Set Canonical Tag
There’s duplicate content all over the web. If you want to syndicate your content on other sites and make sure you don’t confuse Google, a canonical tag is the way to go.
A canonical tag is a piece of code that sits behind a page or post and tells Google “If you find others like me, I’m the original. Give me credit.” Best practice is to tag every post with a self-referential canonical tag that states “I’m the original”. Yoast global settings allow you to set default canonical tag for every page and post on your site. For individual pages and posts, you can change the default on the advanced tab of the Yoast SEO plugin (as shown below).
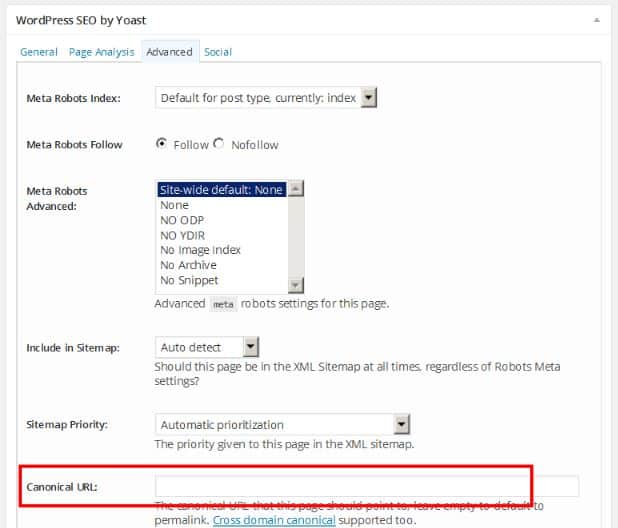
Leave this field blank and the canonical URL will default to the current page or post. If you are republishing an existing post from someone else’s blog and have been given permission to do so, this is where you would insert the URL of their original post.
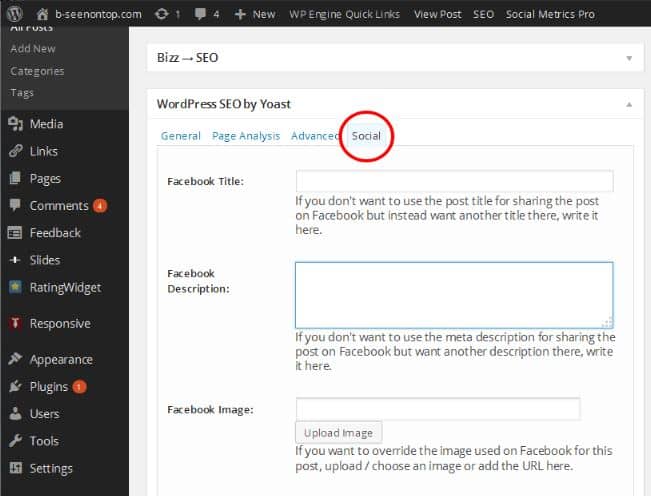
10.4: Set Social Tags
One of the whole points of blogging is to gain exposure. You want your content to get shared on social media and you want to maximize its impact when it is shared.
You can use WordPress to automatically publish your post on your website and social media channels at the same time. I’ll not explain how to do that here, but the cool thing about Yoast is you can customize what gets shared on the bigger social media sites like Facebook and Twitter. If, for example, you’ve quoted someone who has a lot of influence on Twitter, you can include his or her twitter handle in the post description so they’ll notice. You can also include hashtags.
If you do nothing, the default Yoast title tag and meta description will be used when your post is shared. To customize the title and/or description, navigate to the social tab of the Yoast plugin as shown below. Enter the custom titles and descriptions you want published on Twitter and/or Facebook.
10.5: Noindex Thin Content
Google has a strong aversion to “thin content”. Thin content includes posts that are:
- short (less than 300 words);
- unoriginal (duplicate, scraped, stolen, or paraphrased);
- manipulative or cookie-cutter;
- keyword-stuffed;
- lacking in substance; and
- auto-generated.
If your post fits the description of any of the above and you do it often enough, you could be penalized by Google. There are many legitimate reasons to have “short” (less than 300 word) posts. Don’t be afraid to publish them. Just make sure you’re not deliberately trying to game the system and you’re adding value for your audience. Three hundred words is simply meant to be a guideline when you’re deciding how long your post should be.
There are legitimate reasons to publish thin content. For example, you might have been given permission to republish another person’s content so long as it is “noindexed”. To noindex a page or post, you simply navigate to the advanced tab of the Yoast plugin (like shown below). The first option at the top is the “Meta Robots Index” drop-down selection box. Click on the drop-down button and select noindex.
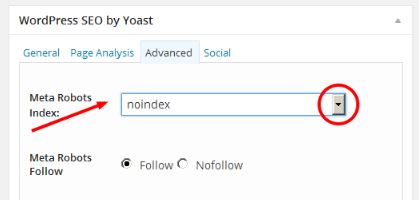
Again, don’t worry if you have a small number of thin posts. The odd one here and there won’t hurt you.
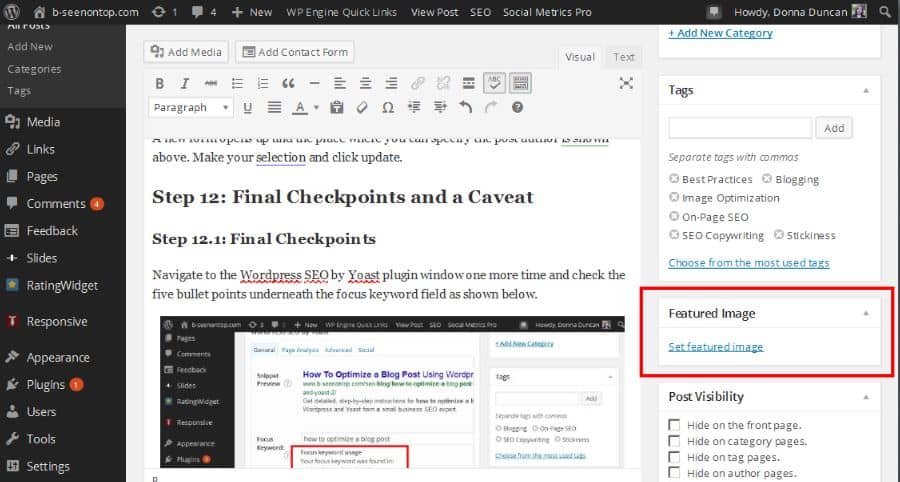
10.6: Set Featured Image
Specify the featured image for your post, the highlighted image that typically appears on your main blog, category, and tag pages.
Step 11: Specify The Post Author
Now we need to tell Google who the author of the post is. This is particularly important if your website has multiple authors. If you’re a single author blog, it’s still a good idea because Google likes accountability – knowing who authored posts. It helps build your online reputation.
Before we do that though, save a draft of your post.
Then go to the main menu on the left and select “Posts”.
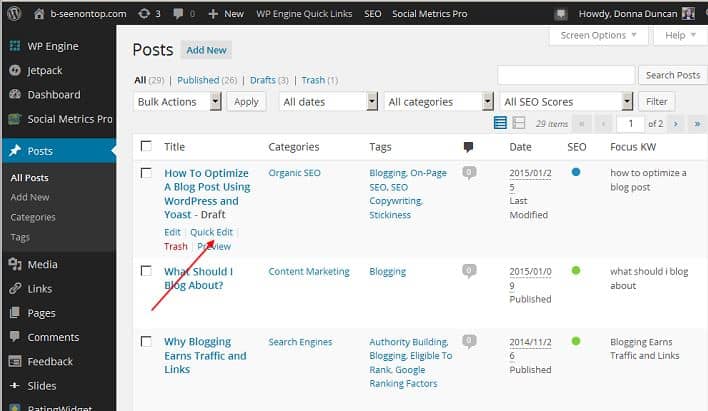
Hover your mouse under the name of the post you’re working on. You’ll see a couple of additional options pop-up. Select “Quick Edit” as shown above.
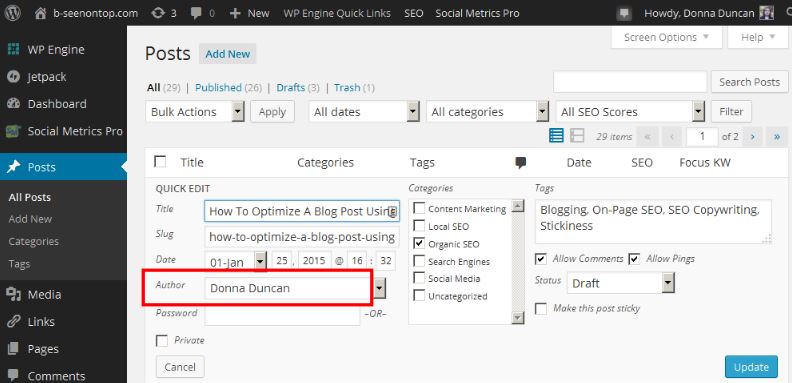
A new form opens up and the place where you can specify the post author is shown above. Make your selection and click update.
Step 12: Final Checkpoints and a Caveat
12.1: Final Checkpoints
Navigate to the WordPress SEO by Yoast plugin window one more time. Go to the SEO tab and click on the SEO Analysis button and review the results.
Ideally, all findings will be green but honestly, that rarely happens. Review the points under the analysis mostly looking to see if you’ve forgotten anything or could improve in one or two areas. It’s not imperative to achieve all greens. Some people obsess over that and it’s a waste of time. What’s most important is that your post is well written, easy to scan (with lots of white space, headings, and visuals), and most of all – helpful to your intended audience. Remember at the very beginning we said the most important thing to do was to satisfy user intent. That hasn’t changed.
12.2: A Caveat
I want to set expectations.
To rank well, your post has to do three things:
- It must get found and indexed by search engines.
- It must satisfy searcher intent, be engaging, and helpful.
- It has to earn exposure and backlinks – more and better than the competition.
This is no easy thing to do but starting with good on-page optimization will increase your chances of achieving these other goals.
A Checklist
We’re done.
Because it’s a lengthy process, I’ve created a PDF and Excel checklist you can use to keep track of your progress. You can download a PDF version of the spreadsheet here. It is a mix of on-page optimization and SEO copywriting tips that can be used as a final checklist before publication.
Thanks for sticking with me to the end! If you have comments or questions, please use the comment section below and I’ll get back to you.


thanks for the wonderful information about SEO.
Thanks for the superb article. I got all the information which I was looking for.
You’re welcome Priya. Glad it was helpful.